The dashboard is not part of the main bus mesh to make reusing the dashboard easier between buses of the same line. All buttons, levers, dials and other moveable dashboard elements are weighted to a bone that can be moved in game.
Mesh Setup
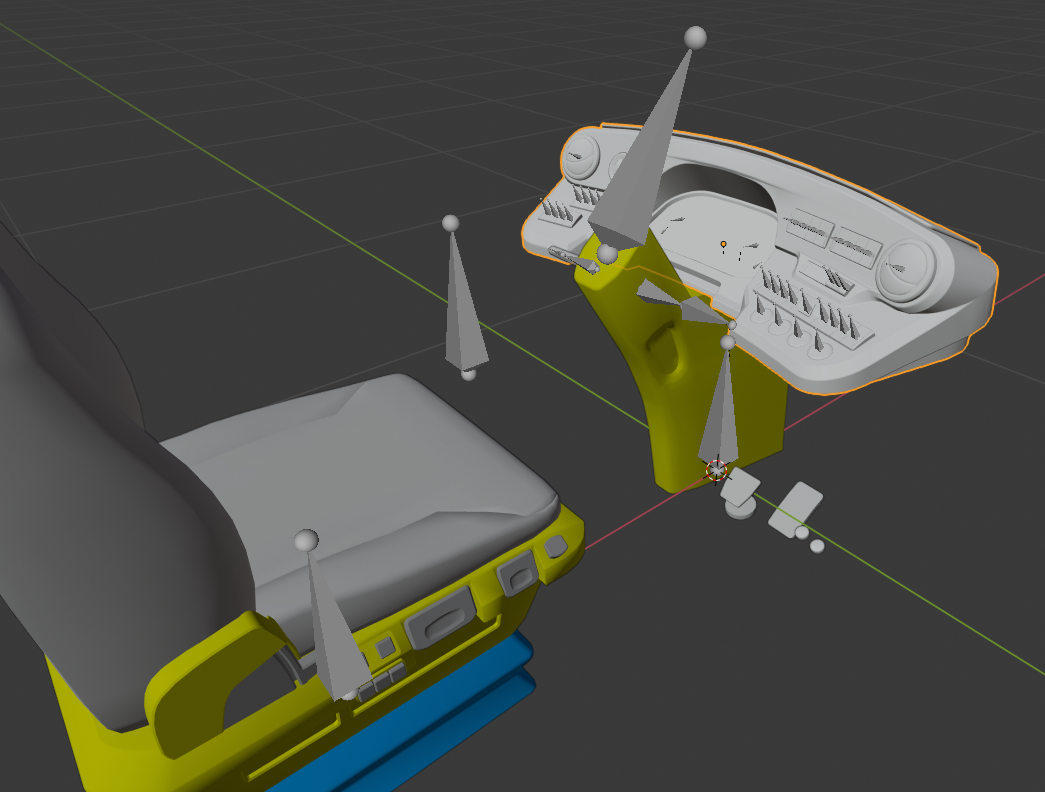
Everything that can move in the dashboard (Button, Dial, Needles) has its own bone that will be manipulated ingame.<gallery>
BoneSetup01.png|Full dashboard bone setup with bones for every button dial and needle
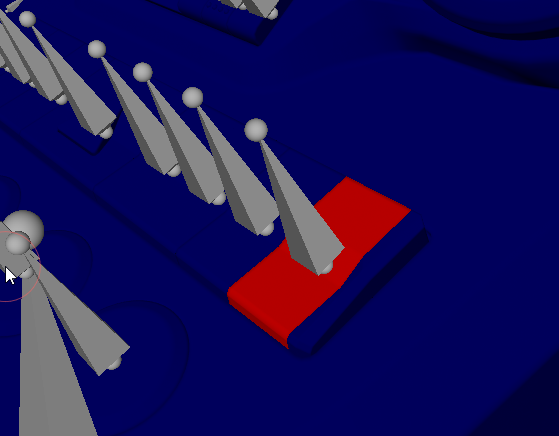
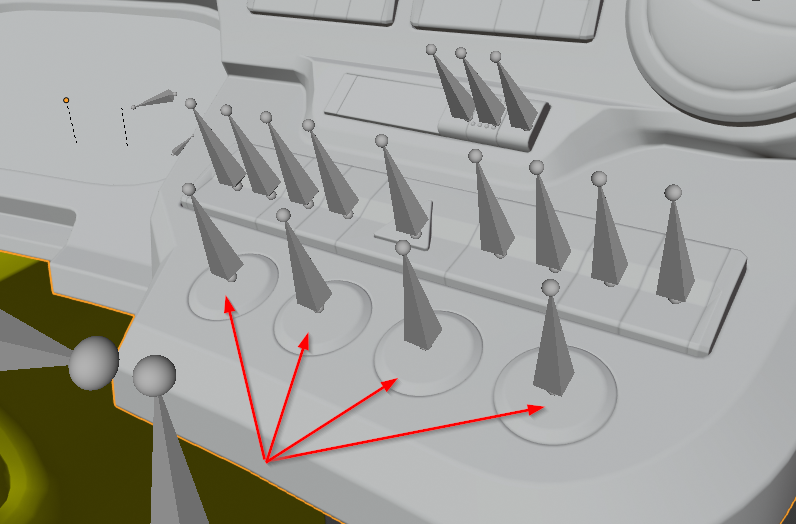
BoneSetup02.png|The door buttons are special. The visuals of the door buttons are spawned on runtime. This allows us to reuse dashboards in multiple buses of a similar type, even if they have a different door count.
BoneSetup07.png|Unreal needs a collider on a bone to register an interaction, thus we add a small mesh to the inside of the dashboard which is weighted to the door button bone to be able to add a collider later on.
BoneSetup03.png|Every other button/switch should be weighted to the bone and the bone should look like in the image, at the center of the button/switch facing out.
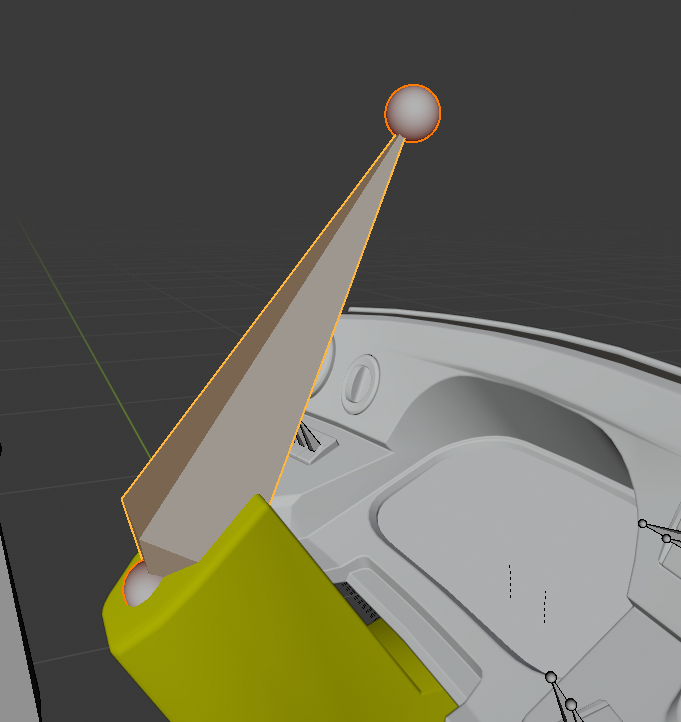
BoneSetup04.png|This is the steering wheel, it should start at the center of the wheel and extend outward where the wheel should be located.
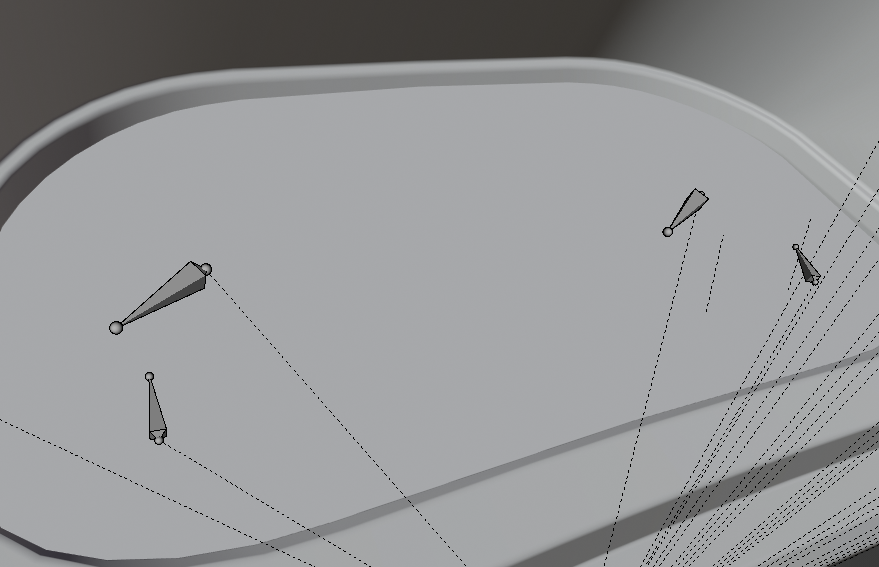
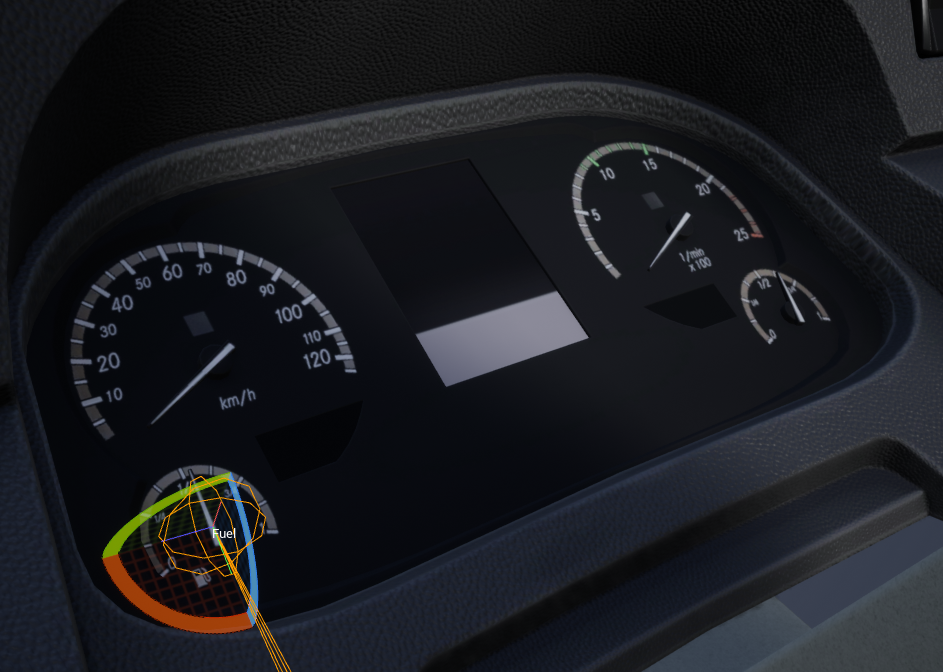
BoneSetup05.png|Needle bones should face the direction of the needle.
BoneSetup06.png|Needle bones should face the direction of the needle.
</gallery>
 |  |  |  |  |  | | | | |

Door buttons
If you want to reuse the same dashboard blueprint in multiple buses and those buses have a different count of doors, we recommend to not add any visuals to the door button bones and spawn the door button visuals on runtime. Add bones for the maximum number of door buttons necessary in you dashboard. For unreal to detect if the user interacts with a bone directly it needs to have some geometry weight painted to it. As the door buttons are not visible in this case we added some very basic geometry to the door bones that are never visible.
Bone Names
SteeringWheel
Seat
Combo_Base (These could change depending on the dashboard)
Combo_Wiper
Combo_Horn
Retarder_Base (these could change depending on the dashboard)
Retarder_Button
BrakeLever
Key
Door_01 (02, 03, etc)
Switch_01 (02, 03, etc)
Blower_01 (02, 03, etc)
Dial_Lights (could be different names here depending on dash. Lights, Ignition, etc, this works for anything on a dial)
Button_Engine_R
Button_Engine_D
Button_Engine_N
Speed (name should fit the needle/gauge)
Fuel (name should fit the needle/gauge)
RPM (name should fit the needle/gauge)
Heat (name should fit the needle/gauge)
Battery (name should fit the needle/gauge)
Physics Asset Setup
[[File:DashboardColliderSetup.png|thumb|Fully setup dashboard physics asset]]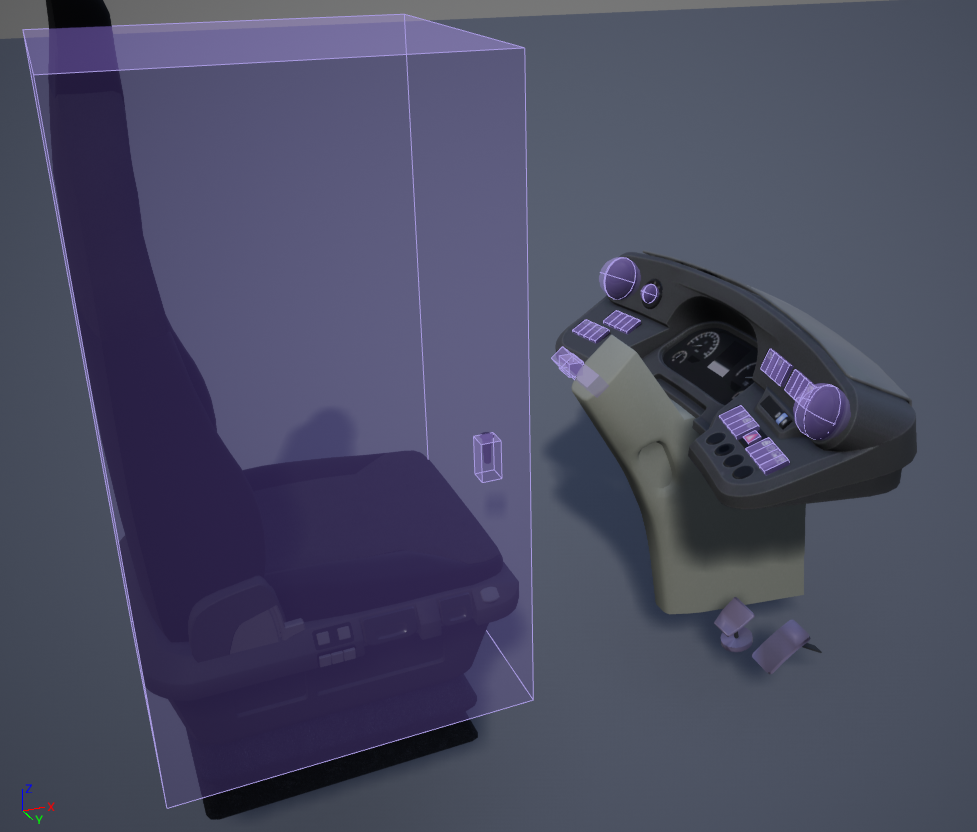
All interactable buttons need to have a collider setup in the Physics asset of the dashboard mesh so they are clickable in the game.
Create colliders with the Tools window
There are a lot of small colliders you need to place, but you can fortunately use a tool to automatically create most of them.
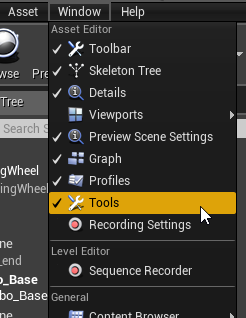
Open the “Tools” “Tools” window in the Physics Asset Editor (Windows -> Tools)
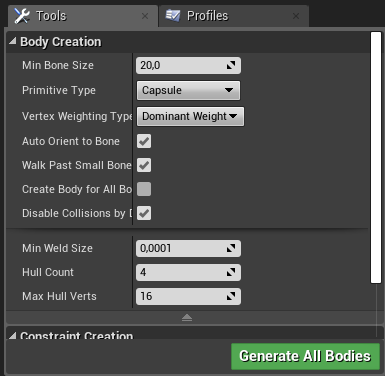
This opens a small window which lets you automatically generate most of the physics bodies we need.
Select one or multiple bones in the skeleton, select the primitive type that most fits the interactable you selected and click “Add Bodies”. This will create a collision body of the selected type which fully covers the space of the submesh weighted to the selected bone. This will not work correctly if there are no vertices painted to a bone, in addition buttons will also only be interactable if there are verticies painted to the bone.
Don’t forget to add a collider to the driver seat. Unreal uses the colliders to calculate the bounds of a mesh for visibility and only shows the mesh if bounds of a mesh are in view.<gallery>
PhysicsAssetToolsWindow.png|Open the tools window
PhysicsAssetToolsSettings.png|Tools window setting
</gallery>
 |  |
Animation Blueprint Setup
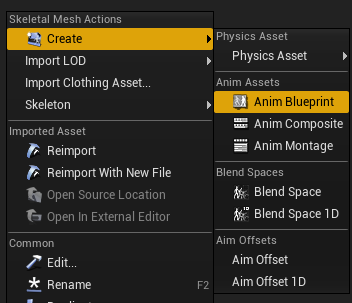
The animation blueprint of the dashboard can be created by right clicking the dashboard skeletal mesh in the content browser and selecting Create -> Animation Blueprint
In the animation blueprints you will need to setup a couple nodes.<gallery>
CreateAnimBP.png|Create the animation blueprint for your dashboard
DashboardAnimBPOverview.png|Animation blue print overview
</gallery>
 | 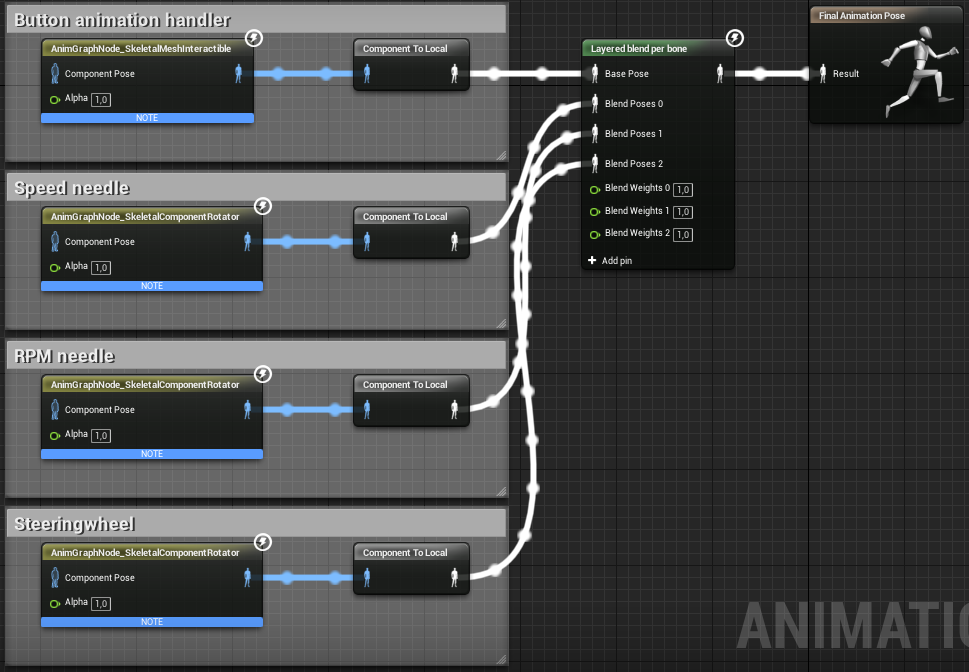 |
Button animation handler: AnimGraphNode_SkeletalMeshInteractible
[[File:LODThresholdSettings.png|thumb|LOD threshold]]
This node will drive all button animations in the dashboard. It uses the data you setup in the dashboard blueprint to move the bones of the buttons, dials and other cockpit components.
Set the LOD Threshold of this node to 1. This causes the dashboard buttons to only be animated if a player is close enough to see it.
Speed needle and RPM needle: AnimGraphNode_SkeletalComponentRotator
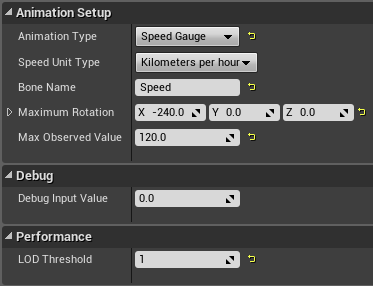
[[File:RPMSpeedNeedleSetup.png|thumb|Speed needle settings]]
Those two nodes are used to animate the speed and RPM needle, their setup is very similar to each other.
Variable Name | Explanation |
|---|---|
Animation Type | Select the bus function this node should observer. |
Speed Unit Type | Only considered, if the animation type is set to “Speed Gauge”. Choose KPH or MPH depending on your dashboard. |
Bone Name | Set this to the bone the animation should affect. |
Minimum Rotation | Default bone rotation offset if the input value is 0. Useful if you want to slightly adjust the initial bone rotation. |
Maximum Rotation | Bone rotation if input value reaches the max observed value. |
Max Observed Value | The value at which the maximum rotation should be reached. |
Debug Input Value | Useful to check if the selected bone rotates to the correct position at a specific value. You need to recompile the animation blueprint after changing this value to see its effect. |
LOD Threshold | The speed and RPM needles are very small thus the animation can be deactivated similarly to the dash buttons after LOD 1. |
Steering wheel: AnimGraph_SkeletalComponentRotator
[[File:SteeringwheelAnimSetup.png|thumb|Steeringwheel settings]]
Variable Name | Explanation |
|---|---|
Animation Type | Set the type to Steering Wheel. |
Speed Unit Type | Ignored when set to Steering Wheel. |
Bone Name | Name of the bone that should be rotated. |
Minimum Rotation | Ignored when set to Steering Wheel. |
Maximum Rotation | This is the maximum rotation in one direction. The steering wheel will rotate between minus and plus the maximum rotation. |
Max Observed Value | Ignored when set to Steering Wheel. |
Debug Input Value | Useful to check if the selected bone rotates to the correct position at a specific value. You need to recompile the animation blueprint after changing this value to see its effect. |
LOD Threshold | Depending on the steering wheel it might be easier to see if it moves from a distance, you might only be able to deactivate the animation in LOD 3 if at all. |
Layered Blend Per Bone
[[File:LayerdBlendPerBoneSetup.png|thumb|Layerd blend per bone settings]]
This node is used to blend the button animations with the bigger dashboard animations.
Add the bones that should be affected by the animation to the branch filters list of the layer.
Blueprint Setup
All dashboard blueprints need to inherit from BPDashboardBaseClass:
you can either create a new blueprint and use this class as parent class
or duplicate an existing one from another bus folder.
make sure in the bus blueprint the Dashboard has the tag added "Dashboard"
<gallery>
BlueprintMeshAnimation.png|Set the mesh to your new dashboard, as well as the associated animation blueprint.
BlueprintDefault.png|If the dash can have varying amounts of doors, please add the door button mesh separate and check the box Automatically Spawn Button.
ButtonDataAsset.png|In SkeletalMeshInteractible_Dashboard at the bottom of the Component List of the Blueprint is where you set the button animation.
InteractibleAnimButtonAnimation.png|Create this Data Asset and set the button animation here.
SteeringwheelScale.png | This is the scale the SteeringWheel_BP (Inherited) should be so that the hands hold in the correct place. The white sphere's should be above the steering wheel.
SteeringwheelHandRest.png | This is where the hands should be set to rest. Cube is left and sphere is right, should be a little below middle of the wheel above it.
</gallery>
Next Steps
On this page:
|